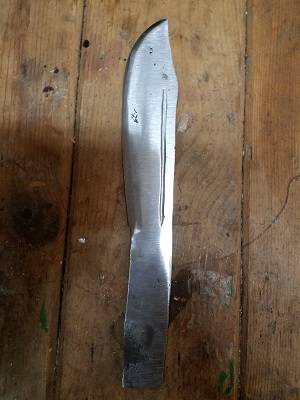
Earlier this year I made a Bowie knife where I was attempting to make it slightly larger than one had made previously and I wanted to try and get a mirror finish on the blade.  It was made from 5160 spring steel flat stock that was 1/4″ x 1 1/5″.  All the forging was done by hand using the charcoal forge.  It took quite a while to get the shape hammered out.

Picture of Rough forging of Bowie Blade (left)
Rough forging of Bowie Blade (left)
Picture of Buoy Knife with fuller ground in
Buoy Knife with fuller ground in


Bowie knife after quenching


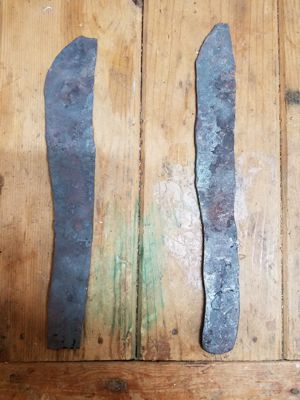
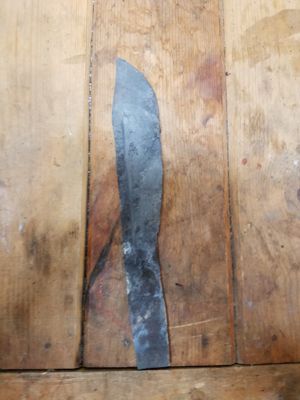
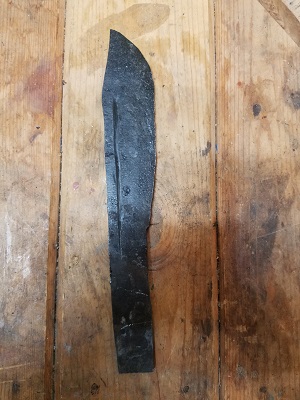
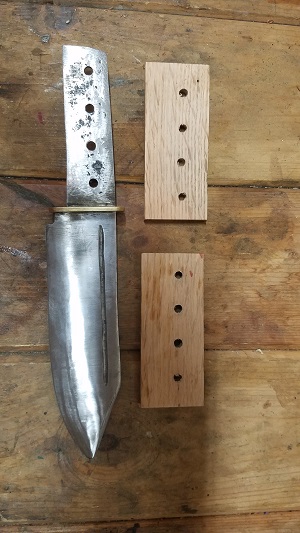
This knife was “ground” using the Harbor Freight 4″x36″ sander and it took a fair bit of effort to get it ground down even using 24 grit belts.  After the heat treat I did more finish grinding and then installed a brass guard that was cut out of 2″x1/8″ brass stock.  The scales were made of wormwood white oak that was dead fall on the homestead.  In addition to milling dead fall into fence boards, I also make project boards that vary but are generally ~3/4″ x 6″ that I use for various projects.

Bowie knife after initial rough grinding
Bowie knife after additional grinding


Bowie knife with guard before installing scales


I have come to the conclusion that I do not like 5 minute epoxy.  It sets up so quickly that if there is a little bit of an issue with a pin, or aligning clamps, all of the epoxy has to be removed.   Since this project completed I am now using 15 minute epoxy and it works better overall for me.  In addition I have found a 15 minute epoxy that has significantly less fumes/chemical smell. Its from Bob Smith Industries and is available on Amazon for around $12.

Bowie knife with handle mostly shaped
Bowie knife after polishing


Picture of Belt Cleaner
Sanding Belt Cleaner


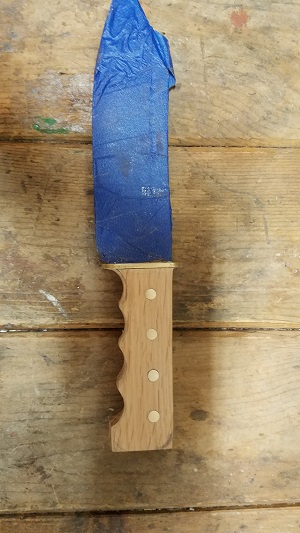
I am using 3/4″ and 1″ barrel sanding drums on a drill to grind the finger wells.  It seems to work pretty well with the exception of the paper constantly clogging.  Every few minutes I have to unclog the drum with a sanding eraser.  They are also called sanding belt cleaners and are available from Harbor Freight or Amazon for under ten bucks for the 8″ long ones.  Using a belt cleaner will definitely extend the life of your belts and drums but you cannot wait until they are totally clogged before cleaning them.

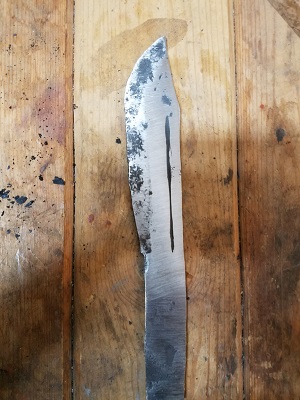
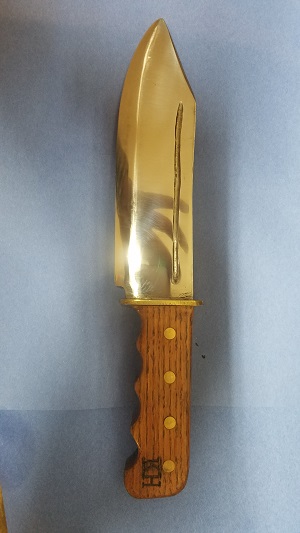
In order to get the mirror finish you have to grind to at least 800 grit.  After that I used 1″ felt drums on a Dremel with polish compound.  Care must be taken when using the Dremel because if any part of the tool rubs against the blade it will make a small scratch.

I originally put a poly coat over the blade except on the cutting edge to reduce corrosion.  It worked fairly well but there were some small oxidization spots that appeared after a few months under the finish.  I removed the poly and touched up the grinding and refinished it.  Removing the poly was a pain and can cause fine grit belts to clog.  I was able to remove some of the finish with paint thinner, but I need to figure out a better method in the future.

Update 11/16/2019 – This blade is up for sale on my Etsy shop here.

After using the charcoal forge I built for a few years I decided it was time to upgrade.  I was spending a lot of time heating metal up to temperature and I would end the the session with soot in my hair and pretty much everywhere.  One downside of the charcoal forge I built (you can read about it here) is that during the forging session ashes and clinkers would collect and the efficiency of the forge would be reduced.

I spent a fair amount of time researching forges and it turns out that if your are in for a dime you might as well go in for a dollar. meaning that going to more burners than two or three didn’t really affect the cost much more.

 In the end I decided to go with Majestic Forge, the prices seemed pretty reasonable and they had setups with more burners.  If you watch “Forged in Fire” you have seen the Majestic 3 burner KnifeMaker setup.  I decided to go with the artist deluxe 5 burner that allows you to heat odd shaped items.  The reason I went for more burners was to allow the option to do longer pieces of work such as swords in the future.

Picture of 5 Burner Propane Forge
5 Burner Propane Forge
picture of 5 burner artist delux
5 Burner artist deluxe
picture of propane forge values
Propane Forge Valves and Cover

I made a stand out of 1 1/2″ angle iron to hold the forge.  It seems plenty sturdy and although in the pictures it looks top heavy it isn’t.  In the future I intend to add some additional angle iron on the side to hold tongs and hammers.  I haven’t exactly figured out how far away I will need to place the handles so they don’t get hot from the forge.

The manufacturer suggested adding covers for burners that are not being currently used, so I made some rectangular pieces out of steel flashing that slide in and out as needed.  The manufacturer explicitly said do not block the entrances to the forge.  I am guessing that is due to liability issues and the potential for turning the forge into a bomb if propane builds up inside with out a fire.  I ran it without blocking the backside for a good while but I eventually fabricated a small ledge to put firebricks on.  The main reason I did this was not to make the forge heat up faster but to prevent excess heat coming out of the rear of the forge due to the limited amount of space available in my shop. 

picture of firebrick on end
firebrick on end

I am using 100 lb propane tank along with a propane extension hose so I could put the bottle 25′ away from the forge.  To operate the forge, you light it and set it to low and let it run for 5-10 minutes to preheat the forge and allow any moisture to evaporate.  The forge is then turned off for 5 minutes and relight.  It costs about $75 to refill the 100lb propane tank which lasts me several months as I use the forge fairly often but not daily for long periods of time.

 Overall I have been very happy with the forge and it is definitely a nice convenience to light it up and not have to worry about bringing charcoal up to heat and having soot everywhere.  In addition it can be run indoors which obviously cannot be done with coal or charcoal without a flume.  While less traditional the propane forge is more well suited to hobbyists where time is a premium.